Monday, February 4, 2008

Chip Jr. -- Up and Running

Well, a lot has been going on lately so I haven't had much time to work but I did manage to get a little done.

I now introduce you to.... CHIP JR!!
It's a little preamp that would be ideal for a mini-amp like I recently built, or a preamp you can hardwire into your guitar and leave it there with no mess or anything!

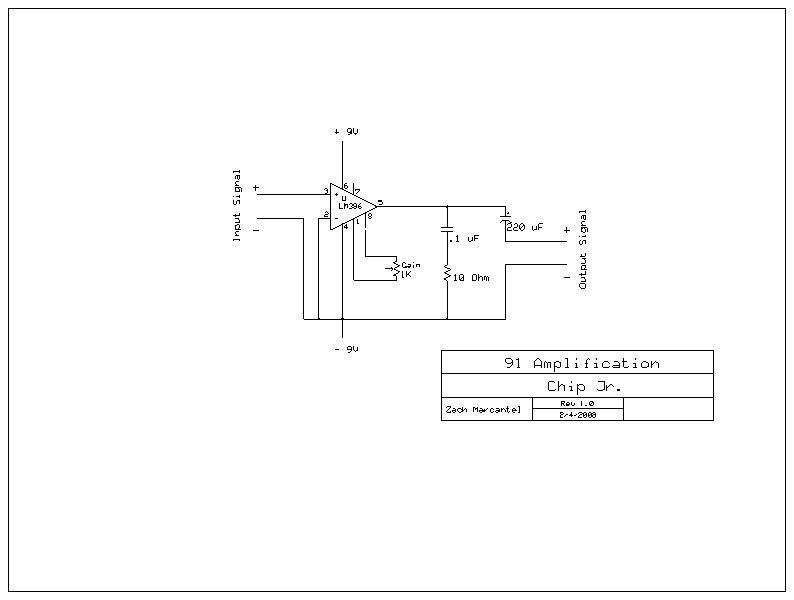
It's based on the LM386 Chip because here lately I have been absolutely IN LOVE with it!
Plus, the parts all together cost no more than $15 at your local Radioshack

Little Chip here is VERY versatile! It can used for many thing as I'll point out in a minute.... but first:


The Schematic

[WARNING: Large image for readability, so 56K beware]

I will also be putting together a PCB layout and put a transfer together for you even more DIY savvy guys...

Anyway, onto its uses...

1. Preamp for a small (less than 10W) practice amp for
A) Built into chassis or head box
B) Put into a separate project box between guitar and amp
2. Built in guitar preamp for leveling between single coil and humbuckers
3. Amplify signal to headphones
A) Through a line-out on the amp
B) On an MP3 player or similar
4. Tiny travel amp (See below)


So there are just a few uses I could come up with but feel free to experiment with it... just give credit where it's due!


Tiny Travel Amp Project

I made one based on an older schematic but same basic principle and I loved it plus it's a good beginner project!

Anyway, simple enough, just wire up a 1/4" mono jack to the input, then replace the output jack with an 8 ohm speaker... I used a little 2.25" speaker and it was surprisingly good quality!
There you have it, now just put it in a box! (HAHA)


Modifications / AddOns

It's not drawn in the schematic but for mine, I used a SPDT (Single Pole Double Throw) switch for power so I can save the battery! You should be able to wire that up really easily.

It is also possible to include a volume potentiometer but I though it redundant because I found I used the guitar's volume control instead and rule #1 says, SIMPLER IS ALWAYS BETTER! well at least in a case like this.

Monday, January 21, 2008

The Parts Are In, Breadboard Done

Well, I got the parts in, then hastily breadboarded the thing and it worked, so naturally I was so excited to get it all soldered in I forgot to take breadboard pictures or sound samples (DOH!). It sounded rather well though if I do say so myself....

Here are a few pictures of what I have on the typical Radioshack PC board...


Photobucket

Photobucket

Photobucket

Please excuse the HORRIBLE soldering job on that last one... I'm ashamed but no shorts so it'll work for now!

I hope to finish it tomorrow as well as get "How to Build a Damn Chippy: Part II" up!

Check back later for more horrible soldering! :)

Sunday, January 20, 2008

How to Build the "Damn Chippy" : Part I

Well then, I have an idea, a schematic, and will have parts tomorrow... I think it's time to build an amp! It will be based of off Beavis Audio's Noisy Cricket with a few of my personal touches.
I will be breadboarding the thing before I actually build it though. If the amp goes well, I may end up making PCB's (and/or entire amp kits) and selling them. Please leave a comment if you would be interested in such a deal.

Until I experiment with it and offer a kit, I will make your life easier and provide a Mouser bill of materials (BOM) that you can import into the "My Mouser" bill of materials importer.


311-1901F-1k|1
311-1901F-10k|1
311-1901F-100k|1
103-0132-EVX|1
103-0008-EVX|1
140-MLRL10V220-RC|2
140-PF2A473K|2
140-PF1H104K|4
513-NJM#386BD|1
512-MPF102D74Z|1
604-WP7113SEC|1
604-WP7113QBC/D|1
568-NYS229|2


Just copy and paste that into the text box. You can then just order the project and it will save you time tracking down all the parts!! No need to thank me! hehe

Now that your parts are on the way, you're in the same boat I am! They should be in tomorrow and I'll post the schematic, my breadboard layout, and some pictures. Who knows, I may even finish and start making a prototype PCB. One can only hope!

Amp Parts are in.... Houston

So the UPS tracking page says they arrived in Houston at 2:46 A.M. yesterday but they didn't come. I'm not sure why or how you don't get a package out of the door in that time frame but hey, I'll just have to wait another day...

I did get my breadboard, multimeter, etc. that I'll need for the build so really I'm just waiting on the parts....

Monday, January 14, 2008

Amp Type Chosen

Well, I've decided to go ahead and build a solid state amp as opposed to a tube amp like I had originally planned. It was a long thought decision but I think the heavier tone and the sheer price comparison will be better for my first amp!


I hope to be able to order the parts within the next weeks. You can bet there will be a worklog!!

Sunday, January 13, 2008

Pictures of the Wood

Well I got the pics on my computer so here they are for your viewing pleasure:


Photobucket
Whole blank


Photobucket
Closeup

Saturday, January 12, 2008

Rock Band + Real Drums = Great Project

Well Brett "Buzz" Dawson built himself a sweet new Rock Band controller... out of a real drum set! He also made a Guitar Hero controller out of what looks to be an Ibanez RG.

In the drum set he uses piezo sensors to create the output signal. That makes it as easy modification to do as well as maintaining the set's original playability.

I like the idea of using a real kick drum pedal though. The stock pedal uses a spring to provide resistance instead of a chain as in a real pedal. This substitution makes sense for a plastic controller but it also makes it hard to play in the higher levels of the game.